| Acoustics
Test Report by RealTraps Principal Ethan
Winer It's well known that an air gap behind an
absorbing panel extends its effectiveness to a lower frequency. Most acoustic panels are velocity
absorbers, which means they act on the wave velocity as sound waves pass through them
and are converted to heat. A car traveling 100 miles per hour toward a brick wall has
plenty of velocity, but once it hits the wall the velocity is zero. Likewise, there's
little wave motion at a room boundary, so velocity absorbers are more efficient when
spaced a few inches away from a wall or ceiling. Bass traps are often mounted straddling a
corner, where an even larger triangle shaped air gap forms behind them.
Years ago someone in an acoustic forum claimed that bass traps
straddling a corner need to be placed tight into the corner, to prevent
"leakage" around the edges. More recently someone else claimed that air gaps
larger than one inch are not useful unless the panel edges have "skirts" around
them to, again, create an airtight seal. So I decided to test these claims, and also test
another bass trap placement method that people have asked about many times.
The official way to assess the performance of acoustic products is
by measuring them in the reverb room of an accredited acoustics lab, as explained
in THIS
article that shows how RealTraps products
are tested. As absorbers are added or changed, the reverb decay times are measured at
multiple frequencies, and from that the amount of absorption is calculated. But such tests
are extremely expensive, and I wanted to compare seven different mounting methods.
For comparative tests - which is better, A or B? - these tests can
be done successfully in a home setting. You can't measure absolute absorption amounts
accurately, but with a large enough sample size you can definitely see performance
differences and trends. To do acoustic tests with confidence at home requires an empty
room large enough to have plenty of reverb, and resonant mode frequencies low enough to
assess bass traps. The room must also be very quiet, without the sound of nearby passing
traffic or the noise of air conditioning blowers.
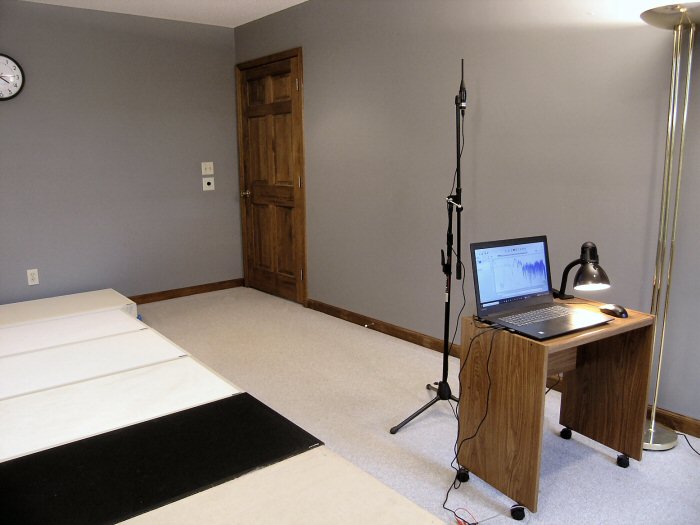
I have an extra room in my home that's 19.5 feet long (29 Hz), 13
feet wide (43 Hz), and 8 feet high (71 Hz), so that's what I used for the tests described
following. The photo below shows the basic setup with a calibrated microphone feeding a
Windows 10 laptop running the Room EQ Wizard software. You can hear this room's natural
reverb when empty in THIS MP3 file.
 |
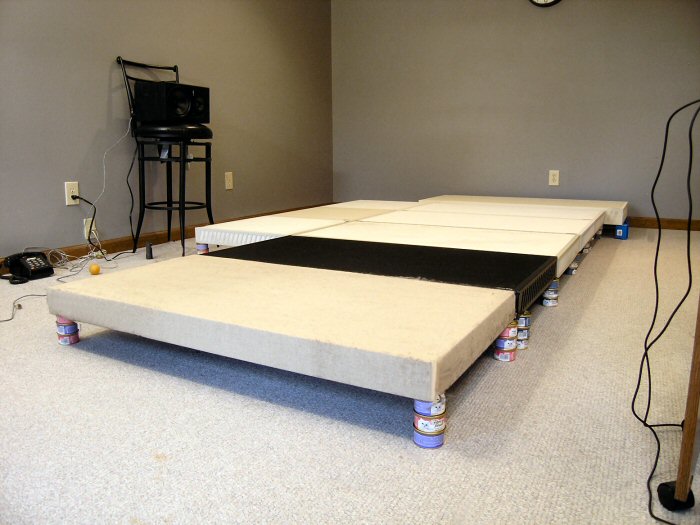
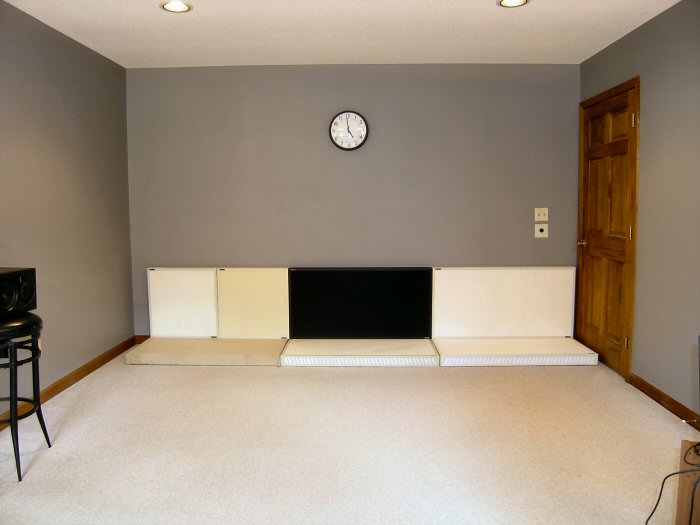
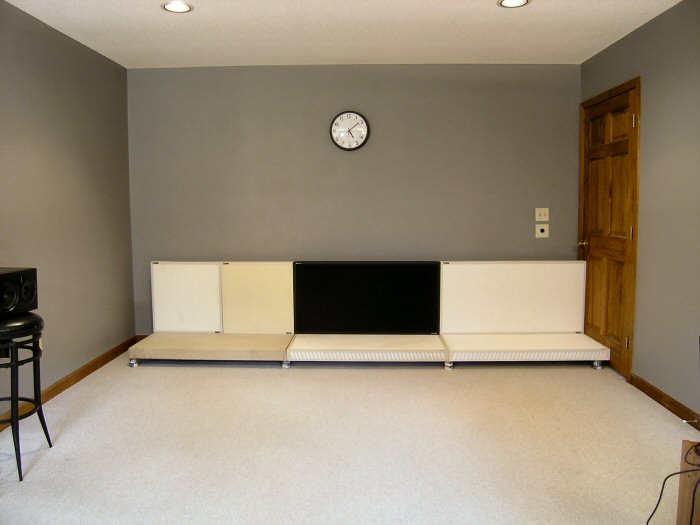
| As is standard for acoustic testing, absorbers are placed
adjacent in a group on the floor. The microphone is on one side of the room, and a Mackie
HR624 professional monitor speaker is opposite (see next photo below). |
The first thing I tested was how an air gap of
varying depth affects absorption at low frequencies. I tested five 2x4 foot RealTraps MiniTraps, one slightly larger
MondoTrap, plus three 2x2 MiniTraps, for a total of 61.5 square feet of absorbing surface.
I tested these nine panels first flat on the floor, then raised up 1-1/2 inches off the
floor, then raised up 4-1/2 inches. Cat food cans served as perfect spacers, and with
three hungry kitties to feed I always have several cases on hand!
 |
These 3-ounce cans of Friskies cat food
are 1-1/2 inches high, making it easy to raise the panels to different heights. |
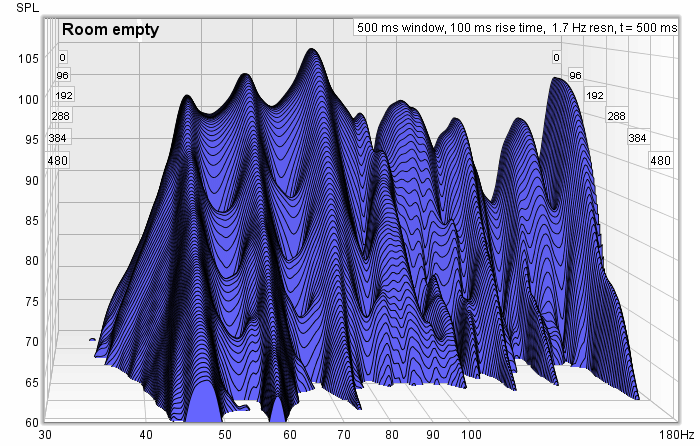
One big feature of testing in a home-sized room is to
obtain data for frequencies much lower than most professional labs accommodate. In this
case, rather than try to compare absolute absorption amounts, we simply assess how quickly
the room's resonant modes decay using a waterfall plot. In this type of graph the
"mountains" come forward over time, and the height of their peaks show the
response peaks of the room. The more sound that's absorbed by the panels, the faster the
ringing decays.
The animated sequence of waterfalls that follows show how absorption
increases as 1) the nine panels are placed in the room flat on the floor, then 2) the
panels are raised to create a 1-1/2 inch gap, then 3) raised further to 4-1/2 inches. With
each reduction in decay times the peaks at most frequencies are reduced in level, and the
trails don't come forward as far because they decay more quickly. So clearly, each
increase in the gap size improves absorption at most frequencies.
 |
This shows the room response and ringing
when empty versus nine adjacent panels with varying air gaps. |
The next thing I wanted to compare is one trap
straddling a corner versus two traps flat against the wall, parallel to the wall. It's
common to have a door in a corner, making it impossible to straddle the corner which would
have been ideal. So we often recommend using two traps in such corners, with one on the
wall and the other on the door. If you can space the traps off the wall three inches using
our Post Base
Mounting Kits all the better. In order to obtain enough of a difference three such
sets of traps were used for the next set of tests.
 |
Straddling a corner is considered the best
way to position bass traps in a room. |
 |
With a door in the corner it's often
recommended to use two traps parallel to the walls instead of one straddling. |
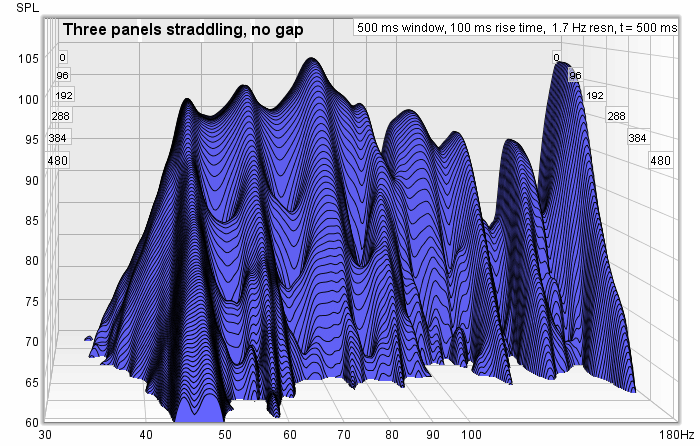
This next animation compares three 2x4 foot MiniTraps
straddling a wall-floor corner versus six 2x4 traps flat against the wall and floor (two
2x2 = one 2x4):
 |
At most low frequencies three bass traps
straddling a corner beat twice as many traps flat on a wall or door. But at higher
frequencies six panels is better because that adds more total surface coverage in the
room. |
Since it's common and recommended to space bass traps
and other absorbers off the wall, I also compared three traps straddling versus six having
three inches of air gap. Here's the setup showing six traps parallel to the wall or floor
with a gap. The vertical traps are also spaced out from the wall behind them:
 |
The next test compares straddling versus
parallel, but with three inches of air gap (two 1-1/2 inch cat food cans). |
With a three-inch air gap behind them, the paired
traps are now much better than one trap straddling:
 |
With a 3-inch gap behind them, six traps
parallel are better than three traps straddling. |
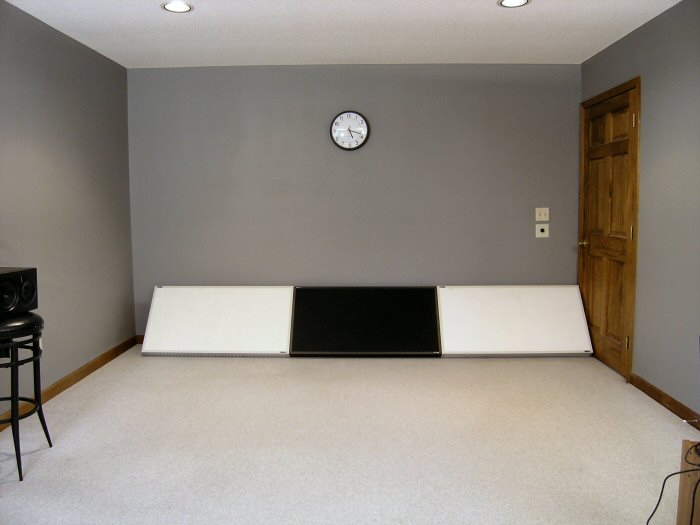
The last test compares straddling bass traps tight
into the corner versus allowing some air "leakage" around the edges:
 |
The final measurement tests whether
allowing an "air leak" harms the absorption of bass traps straddling a corner. |
I wasn't able to prop the traps up on cat food cans,
so I used single-gang plastic electrical boxes below and behind the three traps shown
above. Nails pre-attached to the boxes conveniently stuck into the carpet and kept the
boxes from sliding around. In this case it turns out that allowing air to leak around the
trap edges does reduce their effectiveness a little at most frequencies.
 |
Bass traps tight across a corner work
better at most frequencies than when air can leak around the trap edges. |
So there you have it - I believe these tests debunk
the myth that air gaps larger than one inch aren't helpful for panels mounted flat on a
wall or hung below a ceiling. But the other claim that bass traps straddling a corner work
better when sealed air-tight is proved mostly true. Of course, even with a gap, bass traps
straddling a corner are still very effective! |
