|
|
Watch the video
Click the images on this page to enlarge them. |
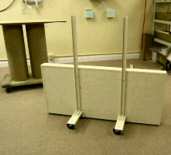
The GoboTrap carriage is designed to hold either two or three 2 by 4 foot HF MiniTraps. The traps are stacked sideways, one above the other, so the completed GoboTrap is 4 feet wide by either 4 or 6 feet high. You will need a Phillips head screwdriver and open end wrench or adjustable pliers (not supplied) to assemble your GoboTrap. |
|
GOBOTRAP
ASSEMBLY The photo at left shows all of the pieces that are included with a GoboTrap carriage. The two U-shaped pieces are the bases, the two angled pieces are the upright channels that rest on and attach to each base, and the two slightly shorter pieces are extension bars used only for GoboTraps that are three units high. The Phillips head screws are not shown, though they are included. Top |
|
ATTACH
THE WHEELS Screw the wheels into the carriage bases until the tip of each wheel shaft just starts to protrude from the other side of the base. Each wheel comes with a nut already threaded onto the shaft. This nut stays on the wheel's shaft while you screw the shaft into the carriage base. The nut is then tightened against the base to prevent the wheel's threaded shaft from working loose over time. |
|
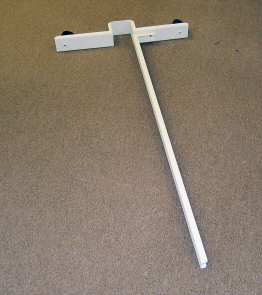
ATTACH THE UPRIGHTS Using the supplied screws, attach one upright member to each of the carriage base pieces. You'll probably find that it helps to work on a table or work bench. The photo at right shows the completed subassembly. Top |
|
ATTACH THE CARRIAGE BASE Lay the first MiniTrap on the table face down, and slide both bases with the attached upright bars over the rear of the trap. Then use four screws to connect uprights to the trap. Do not make the screws too tight! After all four screws are attached you can lift the base and trap assembly by the trap and set it on the floor, as shown in the inset photo. |
|
Next, stack the second trap
on top of the lower one, and attach that with the supplied Phillips head screws. If your
GoboTrap is only two units high, attach the upper trap using all four screws and you're
done. If you will be adding a third trap, attach only the lower two screws at this time. When three traps are stacked, the top trap is secured to the rest of the assembly with an extension bar that also connects to the middle trap. Likewise when a Plexiglas barrier is used in the top position. Notice that the extension has three holes, and the hole closer to one end goes on top. The photo at left shows the two upper traps. Please be careful that the top trap does not fall on the floor while you are working on it! Place an extension piece inside one upright channel and align its lowest hole with the top hole in the upright. Now you can attach the upright, the extension, and the top of the middle trap with a single screw. Next, attach the top trap to the extension using two more screws. Finally, repeat the same procedure with the other upright, then step back and admire your work! Top |
|
Entire contents
of this site Copyright © 2004- by RealTraps, LLC. All rights reserved. |
)
)
)
)
)
)
)
)
)
)
)