|
|
Click the images below to see them full size.
"For additional bass trapping you can put two traps vertically in each corner if your ceilings are high enough."
|
The table of contents below will direct you to the various mounting sections.
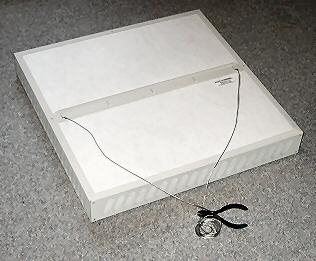
RealTraps are extremely versatile and can be installed in corners, on walls, or from the ceiling. They're also light enough to hang using standard metal picture wire. Simply thread a wire through the holes in the mounting bars on the back, then hang the wire over a small wood screw or wall anchor that's been attached to the wall or ceiling. All of the pieces needed to mount your traps are included with your order. RealTraps have standard mounting struts on the rear shown at left below. The slots accept wires or hose clamps, or you can use the 8-32 threaded inserts to attach them to stands. MiniTraps, MondoTraps, and MicroTraps come with two self-drilling wall anchors, two D-rings, and a length of picture wire. If there's a stud behind the wall where you're attaching a D-ring, you can use the screw that comes with the wall anchor. Otherwise use a wall anchor. Wall anchors can be used with walls up to 3/4 inch thick. For walls up to 1-3/4 inches thick we suggest toggle bolts (1/2 inch hole, not included) instead of the supplied wall anchors. For concrete walls and ceilings we recommend solid-wall anchors such as THESE, or others commonly made of lead to expand inside the hole. For 2 by 2 foot MiniTraps the included pieces are one wall anchor and 1 D-ring. If you intend to mount the panel in a ceiling tri-corner we can instead provide two cable ties and a pair of springs. Only one cable tie is needed, but we include an extra as a spare. RFZ Panels include a metal clip that attaches to the wall and slips under the top edge of the panel. A separate page shows how to install RFZ Panels on a ceiling. Most RealTraps are mounted using the rear mounting bars as shown at left. These bars have raised slots that accommodate picture hanging wire, or radiator hose clamps for mounting on microphone stands. There are also 8-32 Pem nuts (threaded inserts) if needed. All bass traps work best when installed in corners because this is where low frequencies tend to focus. However, RealTraps are especially effective in a corner because the large air gap behind them extends absorption to lower frequencies. Besides the standard vertical corners at adjoining walls, a corner at the top of a wall where it meets the ceiling is equally appropriate, as is the corner at the wall and floor. Ceiling corner mounting is ideal for small rooms where wall space is at a premium. Top |
|
If the room is very live sounding you can put additional MiniTraps on the walls, as shown at left. Wall-mounted traps should be spaced off the wall a few inches to enhance their low frequency performance. The easy way is to hang the traps like a picture and stuff a wadded up plastic bag behind them to get them off the wall. The Rigid Mounting page offers a more stable and permament solution that is not difficult. The photos on this page show a variety of mounting methods, and can serve as a guide for installing in your own rooms. Because MiniTraps are easy to handle you can lean them against the walls and corners - perhaps resting on a cardboard box or chair - temporarily as you experiment with different locations. Top |
|
2'x2' MiniTraps are intended
mainly for mounting in tri-corners where two walls meet the ceiling or the floor. They can
also be used in regular corners or anywhere else a 2'x4' MiniTrap won't fit. Please be careful when installing your MiniTraps! Be especially careful that hanging wires are securely wrapped at both ends - especially with ceiling mounting - to ensure that a trap won't fall down and hurt you or damage your audio equipment. See the section Attaching Picture Wire below for instructions. Top |
|
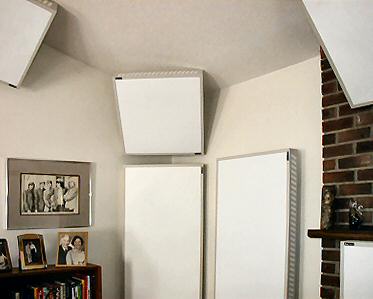
For standard ceilings eight feet high, the best way to treat a corner completely is to use a regular 2'x4' MiniTrap in the wall-wall corner, then add a 2'x2' MiniTrap above that in the tri-corner where both walls meet the ceiling. If you have room you could put a second 2'x2' MiniTrap on the floor in that tri-corner. This is shown at left and in the photo above. For higher ceilings you can place two 2'x4' MiniTraps in the wall-wall corners, though you should center them evenly for the most air space above and below each unit. Top |
|
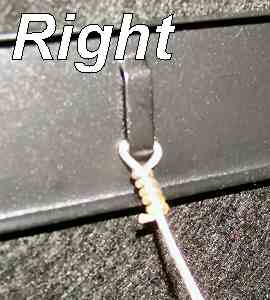
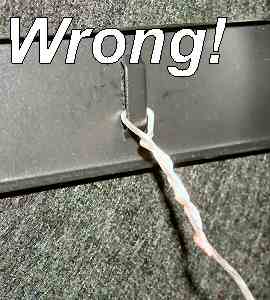
When attaching picture wires to the back of your traps or to the D-rings (see below), be sure the wires are secure and can't pull loose. The photos at left show the right and wrong way to secure a wire. When done correctly, the end of the wire is wrapped at least five times around the main portion, much like a hangman's noose. Do not simply twist the two wires together as shown in the lower photo at left. Even if you twist them tightly they can still pull apart under the weight of the trap. After you are done securing each wire to the trap or D-ring, tug on it firmly to be sure it will not pull loose. Top |
|
For vertical corner mounting the simplest method uses one D-ring (or picture hanging hook) screwed directly into the corner with the screws supplied with your traps. This is shown in the two photos at left. An alternate method uses two D-rings, and is needed when there's no wood studs in the corner to screw into. In that case you'll use two separate hanging wires about 2 feet long, and one screw or wall anchor in each joining wall. This is shown in the drawing below the photos at left. Put the screws or wall anchors 15 inches out from the corner, 2 inches below where you want the top of the trap. For horizontal corner mounting place the screws or wall anchors 19 inches out from the corner. Then attach the supplied D-rings as shown in the corner photo at left, and attach the wire to the outer-most tabs on the trap's upper mounting bar. Corner MondoTraps: For Corner MondoTraps having beveled sides put the screws or wall anchors 9 inches out from the corner instead of 15 inches. We suggest that you center corner-mounted MiniTraps and MondoTraps vertically, so the space above and below them is not blocked by the ceiling or floor. Allowing sound to get behind the traps lets them absorb more efficiently from that side too. Note that placing 2'x4' MiniTraps horizontally across a wall-wall corner impinges on the room quite a bit, so that type of mounting is useful mainly in large rooms.
The drawing above shows how much wall distance is taken by traps straddling a corner. Note that for MiniTraps and non-corner MondoTraps, it's not necessary to place them at exactly 45 degrees. If a door or window is closer than 19 inches from the corner, it's okay to change the angle. As long as the trap basically straddles the corner it will work well. Top |
|
|
|
Using one length of picture wire, pass the wire through the outer-most tab holes on the mounting bar and secure the ends so the center of the wire does not quite reach the top of the trap. Two inches from the top is perfect. Then attach a screw or wall anchor to the wall, and hang the trap. If you have access to a stud behind the wall you can use a wood screw, which is easier to attach than a wall anchor and makes a smaller hole. After either is screwed in fully, unscrew a few turns to expose about 1/4 inch of the shaft, then place the wire over the exposed shaft. |
|
Take one length of picture wire and attach it to the mounting tabs as shown at left. Then hang the trap on a hook or screw. |
|
You can optionally mount RealTraps at an angle with Post Bases as shown at left. This is useful for absorbing reflections for someone seated, and also for someone else standing behind them. |
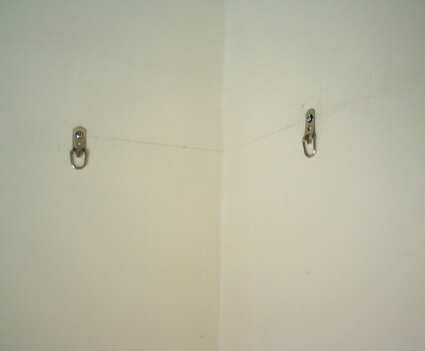
Referring to the drawing above, we suggest you put the loop hangers 40 inches apart. The mounting bars on the back of a MiniTrap are closer than that, but if you use the same spacing you'll have to reach in too far to attach the wires while working on a ladder. By spacing them 40 inches apart each hook is four inches from the end of the trap, which is far enough in to hide the wires, but not so far that you can't reach in and tie the wires to the hooks.
|
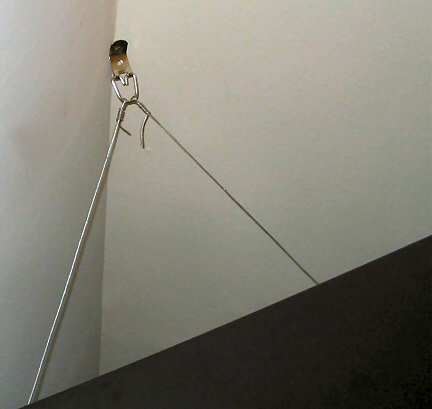
MiniTraps can be mounted straddling the ceiling corner or parallel to the ceiling. For a standard sheet rock ceiling you'll use D-rings like the one shown at right, and attach those to the ceiling with wall anchors. With a grid ceiling you can use the clips we provide (free upon request, not shown), and thread the wires through the clip holes. Then you can wrap the wires through each loop and secure it tightly. When installing a MiniTrap on the ceiling, you should attach the wires to the outer-most tabs on the back of the MiniTrap for added stability. These tabs are identified in the drawing below. For ceiling corner mounting, each MiniTrap requires two wall anchors or two grid ceiling clips, and four lengths of picture wire. Install one wall anchor or grid clip to support each side of the MiniTrap, and connect both wires to the same bolt or clip. Then do the same for the other end of the MiniTrap. You should secure all four wires to the MiniTrap first, and then thread the wires through the loop hook or grid clip. We suggest you use wires longer than necessary - say, two or three feet long - which makes it easier to hoist the MiniTrap into position and secure the wires to the loop on the ceiling. It's best if you have someone else hold the MiniTrap while you attach the wires to the ceiling, but one person can do it using a second ladder just to hold the MiniTrap while working.
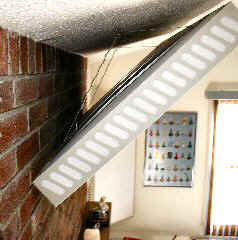
For ceiling corners you can optionally use four hangers, with two on the wall and two on the ceiling as shown at left with the blue ceiling. This is a little more work initially, but it's easier to get the trap at the correct angle. Another alternate method is shown at left below. Here, lengths of light-weight chain are attached to the MiniTrap using picture wire at each end, then the chain is hung on a hook secured to the ceiling. Click the images to see them full size. Top |
|
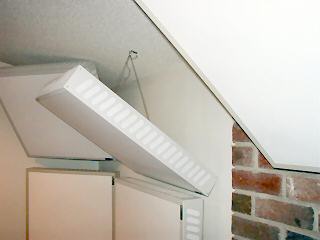
To mount a MiniTrap or MicroTrap parallel to the ceiling you'll use four lengths of wire for each trap, plus two D-rings attached with wall anchors or wood screws, or grid ceiling clips. Put the D-rings about 40 inches apart as shown at left, then connect two wires between the trap's mounting bars and each ring. We recommend leaving an air space of three to four inches between the trap and the ceiling above, with larger spacing giving more absorption at the expense of impinging on the room height. Another choice for ceiling mounting is to use post bases as described on the Rigid Mounting page. However, for ceiling mounting it's best to use four post bases instead of three as shown on that page. Top |
|
MOUNTING 2x2 MINITRAPS IN TRI-CORNERS Follow the instructions shown on the Tri-Corner mounting page. Top |
|
MOUNTING 2x2 MINITRAPS IN CEILING CORNERS These photos show how to install a 2'x2' MiniTrap in a regular ceiling corner. Step 1: Attach two wires to the outer holes on the MiniTrap's mounting bar. Each wire should be about 1-1/2 feet long as shown here. Top |
|
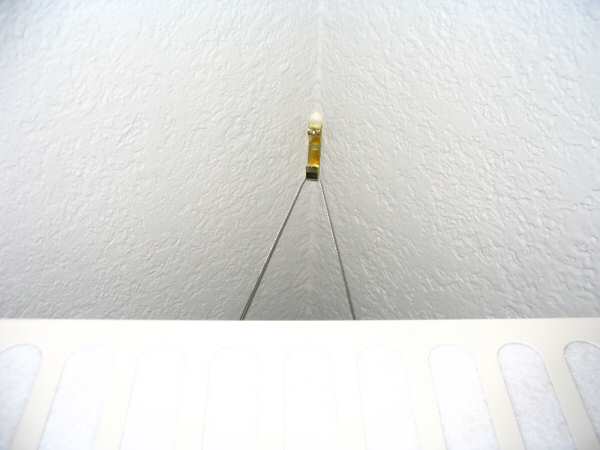
Step 2: Position the MiniTrap under the hanging loop. You can use the ladder's paint shelf to leave your hands free for attaching the wires. Top |
|
Step 3: Thread both wires through the same hanging loop. Tighten one wire and wrap it around itself a few turns. Then tighten the other wire and wrap it just once or twice. You may have to go back and forth a few times until the trap is hanging straight, but it's not difficult and takes only a moment. Once the trap is straight, wrap both wires a few more turns to make them fully secure, then you can trim any excess. Top |
|
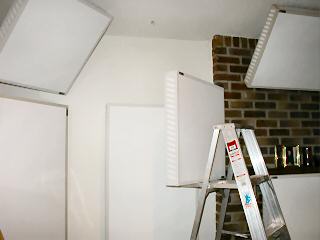
DON'T HAVE A HELPER? Here's one way to get MiniTraps into position under a high ceiling, so one person can install them alone. Most step ladders have a little shelf meant to hold a paint can, and that shelf is also useful to support a MiniTrap while you jockey it into position. Top |
|
Entire contents
of this site Copyright © 2004- by RealTraps, LLC. All rights reserved. |
)
)
)
)
)
)
)
)
)
)
)
)
)
)
)
